This section of the book concerns ways in which people have attempted to preserve the image in the viewfinder. The three main methods are
1. tracing,
2. photography
3. by eye.
The variations on these three methods are summarised in the illustrations below, then described in more detail in the remainder of this chapter.

The tracing corresponds with the scene exactly, but only when the viewer is at
the appropriate distance from the glass, as in image 1.
The Senate House of the University of London as traced on a window photographed with the camera moving closer in stages.
E. H. Gombrich, The Image and the Eye (1982), p194.

This illustration by Albrecht Dürer (1471 – 1528) shows a similar method. Instead of glass, the image is seen through a grid or net of strings. Thus the image is divided up into squares which the artist can copy on to the equivalent squares in his drawing.
A comparable image may also be produced in a camera obscura. The artist traces the image manually on to a piece of tracing paper. This is the method which Canaletto (1697 – 1768) and others used.

A camera lucida is another effective optical device, which enables the artist to trace a virtual image.

Cornelius Varley (1781 – 1873) devised the graphic telescope, an improvement to the camera lucida. This enabled practitioners to make some extremely precise drawings.

The image may also be preserved photographically. This has the advantage of very great convenience, though making a print which is colour-accurate is more difficult than it might seem at first.

In the illustration at above, the photographer has pointed her mobile phone at the scene she was viewing, and recorded it. In effect she invites the viewer look at the part of the environment which the photographer has isolated in the frame or viewfinder.

Finally, there is drawing by eye, without optical aids. This is the least accurate approach and success depends very much on the skill of the artist. The artist may tend to draw schemata rather than trace the outlines of the objects. As Gombrich expressed it, there is always a pull towards the schematic and away from the impressionistic. (‘Drawing what one knows rather than what one sees’). However, this is not necessarily a defect, depending on the purpose for which the drawing is being made.
The drawing shows the great landscape artist, J.M.W. Turner, making a sketch.
by Charles Martin
pencil, 1844
National Portrait Gallery, London, UK.
Now to look at these methods a little more closely.
MAKING AN ACCURATE DRAWING OF THE IMAGE IN THE VIEWFINDER.

A draughtsman drawing a portrait, (published 1532)
The subject in his chair does not move, while the pane of glass which forms the picture-plane is clamped rigidly to the table, and so is the stick which marks the exact point in space where the artist must place his observing eye. In this way the subject, picture-plane, and observing eye are fixed. Only the tracing hand of the artist is allowed to move.
Earlier chapters have treated an artist’s representation as an elaboration of what a child does, making a line or a shape to stand in for something observed in a scene – either real or imagined. However this is an alternative approach. Rather than starting with a line, here one starts with the scene and makes a tracing of it. This approach is seen as its simplest when a viewfinder is set up physically.
For the viewer, it is as if the viewfinder enclosed a perfect image of the real world. Strictly speaking, what appears in Dürer’s viewfinder is not an image, but an array of light – a display, or distribution. The light would only form a true image if and when focused by a lens. However, as far as the observer is concerned , the array does function as an image.
Dürer’s rigid set-up is perfect for making an exact tracing. Different people might choose to trace different parts of the image, for example not everyone would choose to trace exactly the same strands of hair on the subject’s head or beard. But if, instead of a man, the subject were much simpler – a black and white picture, a silhouette for example – then this opportunity for choice would be almost eliminated. Then all accurate tracings would match. Everyone with normal eyes would be able to trace what appeared in the viewfinder, and that would be the same for everyone. In that sense, everyone sees the same.

USING A WINDOW AS THE PICTURE PLANE

By Joseph D’Amelio
The concept of the picture plane may be better understood by looking through a window or other transparent plane from a fixed viewpoint. Your lines of sight, the multitude of straight lines leading from your eye to the subject, will all intersect this plane. Therefore, if you were to reach out with a grease pencil and draw the image of the subject on this plane you would be “tracing out” the infinite number of points of intersection of sight rays and plane. The result would be that you would have “transferred” a real three-dimensional object to a two-dimensional plane.
By Joseph D’Amelio, Perspective Drawing Handbook (1964)

In figure 1 the line is a tracing of the array – or image on the picture-plane(in this case the glass window).
In figure 2 the same line is seen from closer. This means it is no longer a correct tracing of the perspectival image.
The same is true of the line in figure 3.
For the tracing to be viewed correctly, the viewer must be at the appropriate distance from the tracing. Only then will the perspective be correct.
Photographs are often printed and displayed at the wrong size as far as accurate perspective is concerned. For example a wide-angle view may be displayed in a book meant to be read at arms length. For the perspective to be correct for such wide-angle printed images, the viewers eye should be only an inch or two from the page. Viewing at arms length makes the photograph look as if it has distorted reality, but all that has happened is that is being viewed at the wrong distance.

https://www.adobe.com/creativecloud/photography/discover/wide-angle-lens.html
VIEWFINDING – ON THE SPOT

A small finder held fairly close to the eye is excellent for finding subjects. However, once a subject is decided upon, it is more helpful to have one with an opening exactly the same size as your sketch. This can be thumbtacked to a slick next to the sketchbox. Place this so the two are aligned, as shown above. In this manner you can keep viewing the real scene as you make your sketch, and you will find it easier to draw all the objects in correct scale and proportion. The image is fairly constant if you keep the head in the same position for both viewing and painting.
From: The Eye of the Painter, Andrew Loomis 1960.
This demonstrates a set-up in which the image-in-the-viewfinder appears to the artist to be the same size as the painting on the canvas. If this visual principle is adhered to, the subject can never be painted larger than life .
THE SUBJECT REDUCED TO THE IMAGE ON THE PICTURE PLANE

Few artists ever stop to realize that in outdoor painting they are really painting a huge pie-shaped slice of the stretch of landscape before them. The importance of realizing this is manifold.
From: The Eye of the Painter, Andrew Loomis 1960
First, the baseline of the painting represents comparatively few feet, while the distance may represent miles across the picture. In the diagram above, note that the baseline of the picture represents only about ten feet. Approximate this line in front of you by sighting beyond the bottom corners of your canvas to the ground with your eye opposite the middle line of your canvas. (AB and AC). Draw foreground material between B and C. You can lay stones at the points B and C and sight in vertical lines above them to find how much distance you should include. The vertical lines arc the right and left edges of your painting. These lines actually fan out to the horizon and distance. This keeps the foreground in correct relation to the distance. The horizon of the picture should be at the eye-level of the painter, and you will find it easiest to paint if you set your canvas so the two coincide.
Thus, by first establishing the actual area of landscape to be incorporated into your canvas you can paint all material the same size as you see it.
VIEWFINDING.

To: Theo van Gogh
Date: The Hague, Saturday, 5 or Sunday, 6 August 1882
The painter, too, can hold up a viewfinder – or perspective frame – as, for example, in Van Gogh’s version above. But at the point when the photographer presses the shutter and finishes his work, the painter begins his, using lines and patches of colour to construct an image which forms a copy of the scene – although it can never be a true copy, because making it up of patches inevitably means that it will be a simplification. The choices the painter made in simplifying will always be apparent to someone who looks attentively.


To: Theo van Gogh
Date: The Hague, Saturday, 5 August 1882
http://www.vangoghletters.org/vg/letters/let253/letter.html
Van Gogh made a little sketch to show how he used the frame.
https://art-landscape.blogspot.com/2010/01/van-goghs-perspective-frame.html
The perspective frame works only if the viewer’s eye is in a fixed position. The painter has to take considerable care to fix this position because the slightest movement away from that position can change what is seen in the frame, sometimes drastically.
In the Durer illustrations the painter has placed a pole so that he can return again and again to the same viewing position.

When the position of artist’s eye and that of the canvas are fixed in relation to the subject, the picture can be one size and one size only. The size of the picture must match that in the viewfinder. To be seen in accurate perspective, the picture can be viewed from one place only. If the viewer is nearer or farther away than this spot, the scale of the picture will be incorrect.
This aspect of image-making is often deliberately ignored. The perspective frame must always be closer to the artist than the subject. On the picture-plane a head can only be life-size (about 9 ins or 23 cm in height) or smaller. In the past, when artists painted larger than life, they adopted a correspondingly non-naturalistic style, as, for example, when Michelangelo painted the giant figures on the Sistine ceiling. These were like monumental sculptures, quite distinct from casts from life, say. During the entire history of naturalistic painting very few portraits have been painted larger than life – the sense that the subject is behind a window pane has always been considered such an important factor in the success of the illusion.
One may wonder whether today’s artists appreciate the contradiction inherent in painting naturalistic forms and colours, but at a scale which is non-naturalistic.
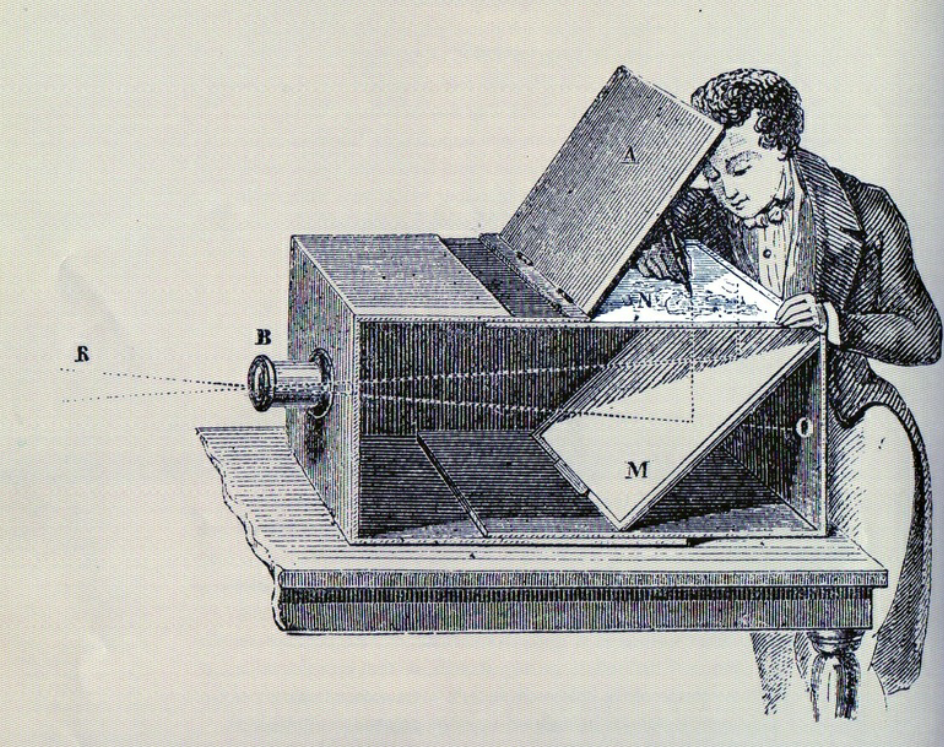
THE CAMERA OBSCURA IMAGE VERSUS THE PHOTOGRAPHIC IMAGE


There are many variations in design of the camera obscura (Camera = room, Obscura = in the shade). The illustration above shows an example which has a mirror placed so as to project the image onto a pane of glass. Tracing paper could be laid over this glass so that the user could trace the image.
When the image is projected onto a plain white surface, it acts as a reflection of the scene. Technical limitations mean that this reflection is not quite perfect. For example, defects in the lens may create certain errors, such as distorting the shapes a little, of imparting a slight halo around objects. The lens is likely to be slightly coloured or tinted, so it will impart a subtle colour cast over the whole image. Also the image will be darker than the scene. But within these limitations, the colours will be accurate, and the relationships between them will be perfectly preserved.

The Entrance to the Grand Canal, Venice, c. 1730
Canaletto would have used a camera obscura when making preparatory drawings for this kind of scene.

The software in a digital camera can make changes to the basic image which the lens produces. Usually manufacturers set up the camera in order to make an image which most customers will find pleasing in colour, rather than accurate; but, when appropriately set up, the digital camera can produce images which are extremely accurate in colour.

The digital image lacks the absolute colour-accuracy of the image in the camera obscura, but it comes very close. As technology improves, the correctly adjusted digital photograph grows ever closer to the image in the camera obscura.
Inevitably, the image in a camera obscura gives a more accurate account of the image in the viewfinder than a hand-made painting. Limitations of the lens mean that colours in the camera obscura will be darker than reality, and slightly tinted; but the relationships between them are bound to be correct. These relationships may not be preserved in a printed photograph, because of technical limitations of the printing process.
IT IS CLEAR WHEN A DRAWING IS INACCURATE

The equation of the way things are represented with the way things are “seen” is surely misleading. No child sees its mother in terms of those crude schemata it draws.
E. H. Gombrich, Art and Illusion, 1960, Chapter IX, page 293
The drawing is not a true account of the light that was presented to the eyes of the child, which is the same as what was presented to everyone’s eyes. A child would be horrified if his or her mother suddenly looked like the drawing.
Confronted by an unflattering portrait, a sitter will often declare: “ So that is the way you see me!” Usually the poor artist has been struggling to make an accurate depiction, not a caricature or any other kind of distortion.
In contrast, a child’s tracing in a camera lucida would look very much like anyone else’s, assuming he or she were old enough to have a steady hand and eye. The same would be true for the other optical devices: the camera obscura and the graphic telescope.

Camera Lucida in use drawing small figurine-
illustration from the Scientific American Supplement, January 11, 1879
Using this method everyone would produce a more or less accurate result. No-one would make a drawing like the child’s drawing below.
CAMERA LUCIDA
Author unknown
The camera lucida was another optical forerunner of the camera and this enabled a portrait draughtsman to trace a profile on paper by looking with one eye through a prism on a support, which when correctly angled, floated the portrait image on the paper. This optical novelty still sometimes appears as a children’s toy but nevertheless was used seriously by some artists, such as Cornelius Varley, in England in the early nineteenth century.

The Temple of Juno, Girgenti, Sicily, 28 June 1824.
The son of William Herschel, the famous astronomer, John Herschel was a renowned astronomer and scientist in his own right.
Herschel made this drawing using a Wollaston Camera Lucida, a drawing aid that allowed the user to accurately delineate the scene being sketched. William Hyde Wollaston (1766-1828) invented the device in 1806 in an attempt to improve his sketching abilities. This was prompted by frustration at his inability to made sketches of the sights he saw during a walking holiday around Europe.
(Photo by SSPL/Getty Images)
THE GRAPHIC TELESCOPE

The Science Museum, London, UK.
A fascinating variation of the camera lucida was devised by the artist Cornelius Varley (brother of the artist John Varley). The Science Museum, London, possesses the original model used by Varley himself. It gave much better results than the camera lucida, but, as with other optical gadgets, the difficulty of setting it up and using it appears to have been too cumbersome for most artists. With a little training, someone with a modicum of talent might often find it easier to draw by eye than to set up one of these devices. Few artists bought graphic telescopes.

Church of Yainville, near Saint Georges de Bocherville, Normandy 1818
Cotman took a graphic telescope with him to Normandy. It is possible he used it to make this drawing.
In 1817 the famous watercolourist, John Sell Cotman, travelled to Normandy to make a survey of historic scenes. He took a Graphic Telescope with him, though how much he actually used it is open to speculation. His sketches were later transcribed as neat copies.

Detail from a drawing which shows the Graphic Telescope in use. Clearly, success in using the instrument depends on having a rigid support, and on the subject remaining absolutely static.

Portrait of John Tatum – Pencil on paper
This drawing was made by Cornelius Varley himself using a Graphic Telescope. The drawing is characteristic of those made with an optical device: the lines which trace the outline of the forms vary little in strength.
THE VARLEY BROTHERS AND THE GRAPHIC TELESCOPE
This page shows more examples of the work of the Varley brothers.
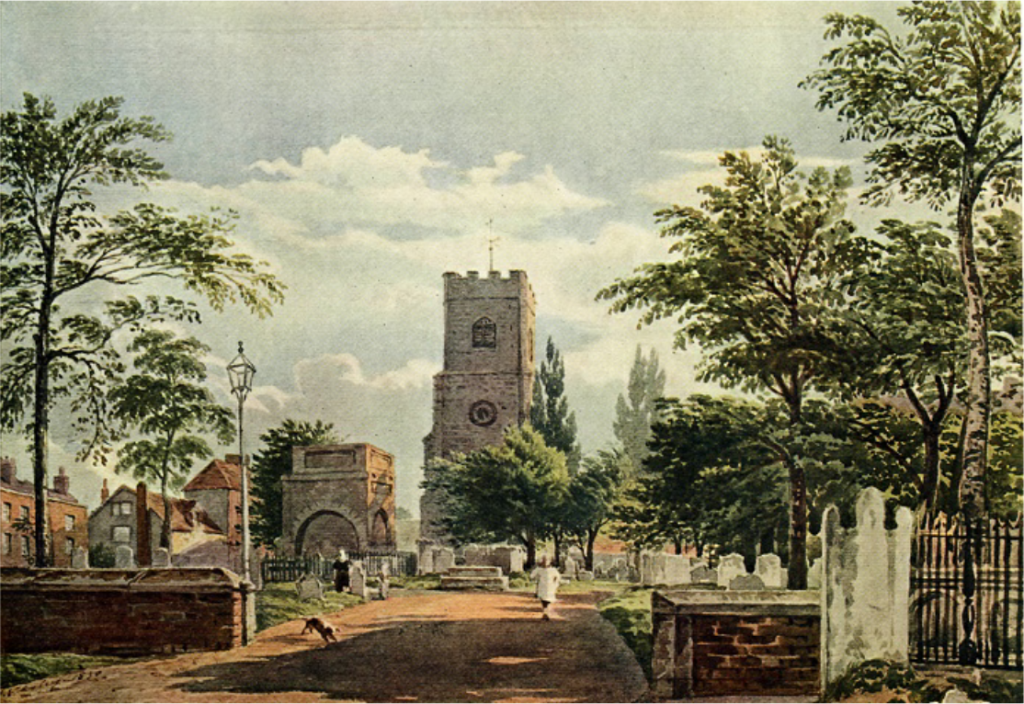
Hackney Church
It is not known whether this drawing was made with the aid of his brother’s invention – the graphic telescope.

Dr Spurzheim
(Spurzheim was one of the chief proponents of phrenology – the study of the shape and protuberances of the skull, based on the belief that they reveal character and mental capacity)
A drawing made with the aid of the graphic telescope.

Tom Tower, Christ Church and St Aldate’s, Oxford, UK
While not documented as having been drawn with the assistance of a Graphic Telescope, this drawing has the evenness of outline and extreme precision of detail that one might expect as the result of using such a device.

Some experts judge that this is likely to be a portrait of the great artist J M W Turner
Drawn possibly with the aid of the graphic telescope.